Whether you are tired of paying premium prices for commercial e-liquids, struggling to find your perfect all-day vape, or simply looking for a rewarding new hobby, mixing your own e-liquid is the ultimate solution. Stepping into the world of do-it-yourself (DIY) vaping can seem intimidating at first. You are faced with strange acronyms, chemical names, and strict measurements. However, thanks to modern DIY vape mix kits, crafting your own premium-quality vape juice at home has never been easier, safer, or more accessible. Best way to find the DIY vape mix kits.
In this comprehensive guide, we will break down everything you need to know to become a master e-liquid mixer. From understanding the fundamental ingredients to troubleshooting a bad batch, we will cover every detail so you can start creating delicious, custom blends with absolute confidence.
Why Choose to Mix Your Own E-Liquid?
Before diving into the technical details, it is worth understanding why thousands of vapers have made the switch to DIY mixing:
- Massive Cost Savings: Commercial e-liquids come with a significant markup to cover branding, packaging, and marketing. By purchasing raw materials in bulk, you can reduce your vaping costs by up to 90%.
- Total Customization: Have you ever bought a strawberry cheesecake liquid and wished it had just a little more strawberry? When you mix your own, you control every single drop. You dictate the exact flavor profile, the nicotine strength, and the vapor production.
- Quality Control: By sourcing your own ingredients, you know exactly what is going into your lungs. You can avoid unnecessary sweeteners that ruin your coils and ensure you are only using the highest quality components.
- Coil Longevity: Commercial juices are notoriously loaded with sucralose (sweetener). This caramelizes on your coils, burning them out rapidly. DIY mixers often use little to no sweetener, extending coil life dramatically.
If you are ready to take control of your vaping experience, a great starting point is investing in all-inclusive DIY vape mix kits. These bundles take the guesswork out of the initial learning curve by providing pre-measured bases and straightforward tools.
The Four Pillars of Vape Juice
Every standard e-liquid on the market, from the cheapest gas station pod refill to the most expensive boutique shortfill, is made of the exact same four core ingredients. Understanding how these elements interact is the foundation of successful DIY mixing.
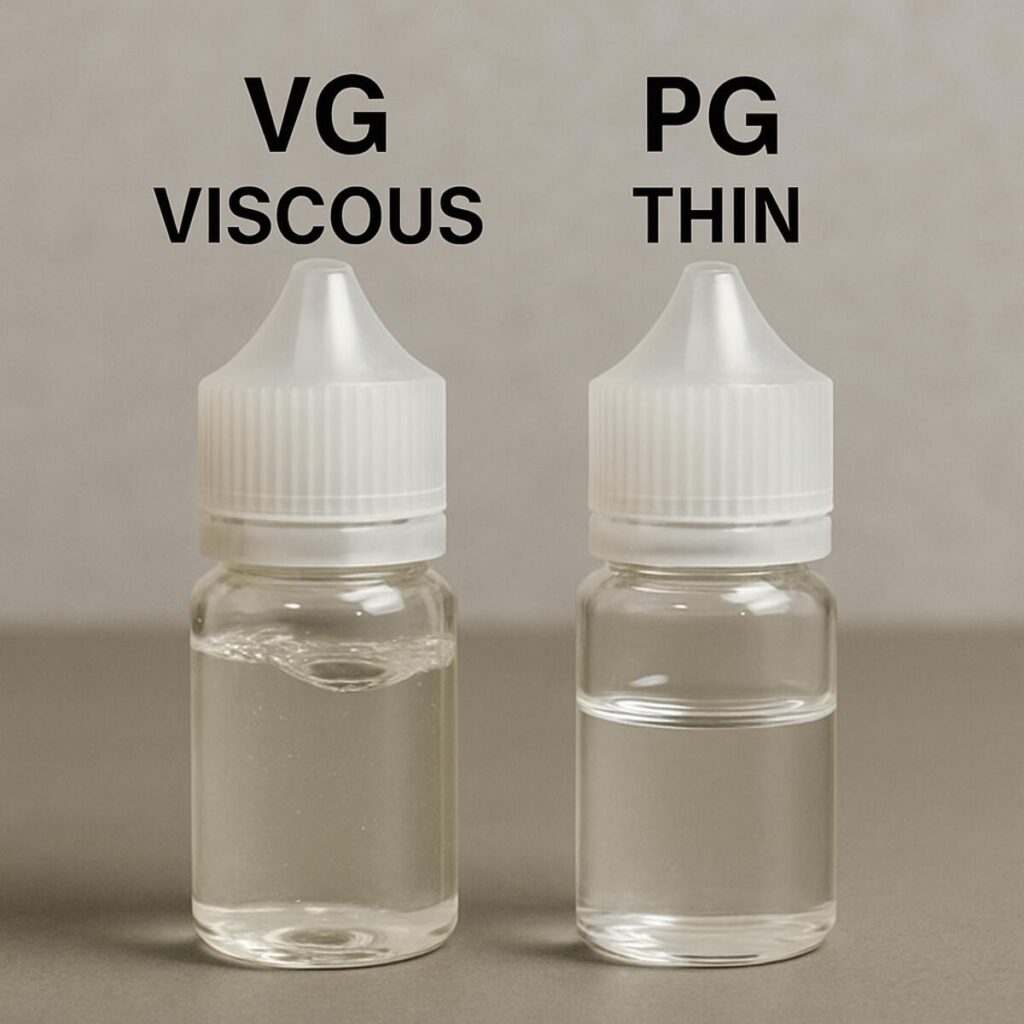
1. Vegetable Glycerin (VG)
Vegetable Glycerin is a natural, viscous liquid derived from plant oils (typically palm, soy, or coconut). In vaping, VG is responsible for vapor production. It has a thick, syrupy consistency and a naturally sweet taste.
- Characteristics: High vapor production, smooth inhale, sweet undertone, thick viscosity.
- Drawbacks: Its thickness can clog smaller coils (like those in older pod systems) and it is not a great carrier of flavor.
2. Propylene Glycol (PG)
Propylene Glycol is an organic, synthetic compound that is thin, colorless, and practically odorless. It is widely used in food, cosmetics, and medicines. In e-liquid, PG serves as the flavor carrier and provides the “throat hit” that mimics the sensation of smoking.
- Characteristics: Excellent flavor carrier, provides throat hit, thin consistency (water-like).
- Drawbacks: Too much PG can cause harshness or throat irritation in some users.
3. Nicotine
Nicotine is an optional ingredient, but for most vapers, it is the reason they vape. In DIY mixing, nicotine is suspended in either a PG or VG base. It comes in two main forms: freebase nicotine (stronger throat hit, traditional) and nicotine salts (smoother inhale, faster absorption).
4. Flavor Concentrates
This is where the magic happens. Flavorings are suspended in PG (and occasionally alcohol or VG) and provide the taste of your e-liquid. It is absolutely vital that you only use food-grade flavor concentrates for vaping that are explicitly formulated for inhalation—you cannot use supermarket extracts or essential oils, as these contain lipids (fats) that are highly dangerous to inhale.
Unpacking the Gear: What Do You Need?
To get started, you do not need a fully equipped chemistry lab, but having the right tools will make the process infinitely smoother, cleaner, and more precise.
Beginner E-Liquid Mixing Supplies
If you are piecing together your own setup rather than buying pre-packaged DIY vape kits, here is a definitive checklist of the essential equipment for home mixing:
- Digital Pocket Scale (0.01g accuracy): If you only buy one piece of hardware, make it this. Mixing by weight is the modern standard for DIY.
- Blunt Tip Syringes and Pipettes: Useful if you choose to measure by volume, or for transferring small amounts of liquid from large jugs.
- Empty Bottles (Chubby Gorilla style): 10ml bottles for testing new recipes, and 60ml or 120ml bottles for your successful all-day vapes.
- Safety Gear: Nitrile gloves and basic safety goggles.
- Paper Towels: Spills will happen; be prepared.
- Labels and a Sharpie: Never rely on your memory. Always label your bottles with the recipe name, nicotine strength, and the date it was mixed.
The Great Debate: Weighing Ingredients vs Measuring by Volume
When you begin researching how to mix, you will encounter two primary methodologies: volume mixing (using syringes) and weight mixing (using a scale).
Measuring by Volume
In the early days of DIY vaping, everyone measured by volume. This involves using different-sized syringes to draw up exact milliliters of PG, VG, nicotine, and flavorings.
- Pros: Easy to understand conceptually.
- Cons: Extremely messy. VG is thick and incredibly difficult to pull through a syringe. Furthermore, you have to wash and dry multiple syringes after every single mixing session to prevent cross-contamination of flavors.
Weighing Ingredients
Today, weighing ingredients vs measuring by volume is barely a debate—weighing is universally recognized as the superior method. You place an empty bottle on a scale, tare (zero) it, and drip your ingredients directly into the bottle, following the gram weights provided by a juice calculator.
- Pros: Zero cleanup (no syringes to wash), pinpoint accuracy, much faster mixing process, and less wasted ingredients.
- Cons: Requires purchasing a digital scale that reads down to 0.01 grams.
Actionable Tip: If you are serious about DIY, skip the syringes and start with a scale immediately. The time saved in cleanup alone is worth the $15-$20 investment in a digital scale.
Decoding Ratios: Finding Your Perfect Balance
One of the most critical decisions you will make when formulating a recipe is choosing your vegetable glycerin vs propylene glycol ratio. This ratio dictates the physical performance of your e-liquid in your specific vaping device.
50VG / 50PG
This balanced ratio is ideal for low-wattage devices, pod systems, and Mouth-to-Lung (MTL) tanks. The higher PG content keeps the liquid thin enough to wick quickly through small coil ports, preventing dry hits. It delivers a strong throat hit and punchy, immediate flavor, though vapor production is minimal.
70VG / 30PG
This is the industry standard for Sub-Ohm tanks and Rebuildable Dripping Atomizers (RDAs). It provides a smooth inhale with thick, dense clouds while still allowing enough PG to carry the flavor profiles accurately.
Max VG (80VG+ or 100VG)
Max VG liquids are primarily used by cloud chasers or individuals with a sensitivity or allergy to Propylene Glycol. Because VG is a poor flavor carrier, Max VG juices often require higher percentages of flavor concentrates. They are incredibly thick and should only be used in RDAs or high-end sub-ohm tanks with massive wicking ports.
Handling Nicotine: Safety, Calculations, and Types
Nicotine is a toxic substance when handled improperly in high concentrations. Treating it with respect is non-negotiable.
Safety Precautions for Handling Liquid Nicotine
Whether you are dealing with a standard 18mg booster or a stronger 100mg/ml base (where legally available), strict safety precautions for handling liquid nicotine must be observed:
- Always wear nitrile gloves: Nicotine is absorbed rapidly through the skin. A spill on your bare hand can lead to nicotine poisoning, which causes nausea, dizziness, and elevated heart rates.
- Work in a well-ventilated, well-lit area: Ensure you can clearly see what you are doing and that fumes are not accumulating.
- Keep away from pets and children: Treat liquid nicotine like bleach or harsh cleaning chemicals. Store it high up in a locked cabinet or a dedicated lockbox in the freezer.
- Clean spills immediately: Use warm soapy water and paper towels to clean any drips on your workstation.
Understanding Nicotine Formats
Depending on where you live, the way you purchase nicotine will differ due to legal regulations.
TPD Compliant Nicotine Booster Shots: In the UK and Europe, the Tobacco Products Directive (TPD) dictates that nicotine-containing liquids cannot be sold in bottles larger than 10ml, and the strength cannot exceed 20mg/ml. As a result, DIY mixers in these regions rely on TPD compliant nicotine booster shots (often 18mg or 20mg).
High-Strength Unflavored Nicotine Base: In regions without such strict volume caps (like parts of the US), vapers often buy high-strength (e.g., 100mg/ml) unflavored nicotine suspended in PG or VG. The advantages of unflavored nicotine base at high concentrations are immense: it is far cheaper, requires you to add very little to your mix (preserving your intended PG/VG ratio), and lasts a very long time.
Calculating Nicotine Strength in 10ml Shots
If you are using TPD shots, doing the math can sometimes confuse beginners. Here is a simple breakdown of calculating nicotine strength in 10ml shots when making a standard 60ml bottle of e-liquid (often referred to as a “shortfill” method):
- To get a 3mg/ml strength in a 60ml total volume, you need exactly 10ml of an 18mg/ml nicotine shot.
- If you are mixing a 120ml bottle to reach 3mg/ml, you would add two 10ml bottles of 18mg/ml nicotine shots.
(Note: Rather than doing manual math, always use a specialized calculator, which we will cover next.)
The Digital Brain: How to Use a Vape Juice Calculator
Attempting to mix e-liquid using mental math or scratchpad calculations is a recipe for disaster. Every flavor concentrate has a specific gravity (weight per ml), and calculating exact percentages of PG and VG while accounting for the volume taken up by flavors and nicotine requires precise formulas.
This is where digital tools step in. Knowing how to use a vape juice calculator (like e-Liquid Recipes (ELR) or All The Flavors (ATF)) is a vital skill.
Here is a step-by-step guide to using a standard calculator:
- Enter your Target Properties:
- Amount to make: (e.g., 30ml for a test batch).
- Target Nicotine Strength: (e.g., 3mg).
- Target PG/VG Ratio: (e.g., 30% PG / 70% VG).
- Enter your Base Ingredients:
- Nicotine Strength: Input the strength of the nicotine base you bought (e.g., 18mg for a TPD shot, or 100mg for a bulk base).
- Nicotine PG/VG Ratio: Check your nicotine bottle. Is it suspended in 100% PG, 100% VG, or a 50/50 mix? The calculator needs to know this to balance the rest of the recipe.
- Input your Flavors:
- Add the names of your flavor concentrates and the percentage you wish to use (e.g., Strawberry 5%, Vanilla Custard 3%). Note: Almost all flavorings are suspended in PG, and the calculator automatically counts flavor percentages toward your total PG ratio.
- Calculate:
- Hit the calculate button. The software will instantly output a recipe card. If you are mixing by weight, look exclusively at the “Grams” column.
Flavor Concentrates: The Art of E-Liquid
Flavoring is the most subjective and creative aspect of DIY vape mix kits. It is what transforms flavorless chemical bases into a mouth-watering dessert or a refreshing tropical ice.
When buying supplies, ensure you are buying food-grade flavor concentrates for vaping. The most renowned and trusted brands in the DIY community include:
- Capella (CAP)
- The Flavor Apprentice (TFA / TPA)
- Flavorah (FLV)
- Inawera (INW)
- FavourArt (FA)
Creating Custom Flavor Profiles from Scratch
While buying pre-mixed one-shots (where a manufacturer has already blended the recipe for you) is incredibly easy, the true joy of DIY comes from creating custom flavor profiles from scratch.
To do this successfully, think of your e-liquid like a physical dessert or a cocktail. You need to build it in layers:
- The Base / Foundation (3% – 6%): This is the heavy, foundational note. For a strawberry cheesecake, this would be the cheesecake and graham crust flavors.
- The Main Note (2% – 5%): This is the star of the show. In our example, a bright, juicy strawberry.
- The Accents / Top Notes (0.5% – 1.5%): These elevate the mix. Perhaps a touch of vanilla swirl to bridge the berry and the cheese, or a tiny drop of sweetener to make the fruit pop.
Warning: More flavor does not equal better flavor. A common beginner mistake is thinking that adding 20% total flavoring will result in a stronger taste. In reality, “over-flavoring” causes flavor muting, where the liquid ends up tasting like harsh, chemical soap. Most modern recipes sit comfortably between 8% and 15% total flavoring.
The Step-by-Step Mixing Process
You have your essential equipment for home mixing, your calculator is set, and your ingredients are ready. Here is exactly how to execute your first mix:
- Prepare your workspace: Wipe down a solid, flat surface. Put on your nitrile gloves and safety glasses. Ensure no children or pets are in the room.
- Set up the scale: Turn on your digital scale and ensure it is set to measure in grams (g). Place your empty, clean chubby gorilla bottle on the scale. Press the “Tare” or “Zero” button so the scale reads 0.00g.
- Add Nicotine First: Carefully drip or pour your nicotine into the bottle until you reach the exact gram weight specified by your calculator. Once done, immediately cap the nicotine bottle and move it out of the way to avoid accidental spills. Tare the scale back to zero.
- Add Flavors: Drip your first flavor concentrate into the bottle until you hit the target weight. Tare to zero. Repeat this process for every flavor in your recipe.
- Add PG: Check your calculator for the required PG weight. Pour it in, then tare to zero. (If your recipe includes a lot of PG-based flavors and you are making a high-VG juice, you might not need to add any raw PG at all).
- Add VG: Top off the mixture with the required weight of VG.
- Cap and Shake: Secure the drip tip and cap onto your bottle. Now, shake it vigorously. VG is incredibly thick, and nicotine and flavors can pool at the top or bottom. You need to shake the bottle forcefully for at least 1-2 minutes until the liquid becomes cloudy with thousands of tiny micro-bubbles. This ensures homogenization.
Congratulations! You have just successfully utilized your DIY vape mix kits to create your own e-liquid. However, you are not quite ready to vape it just yet.
The Steeping Process: Patience is a Virtue
One of the most frequently asked questions by beginners is: “Why does my freshly mixed juice taste like perfume or nothing at all?” The answer lies in the steeping process for homemade e-juice.
Steeping is simply the act of letting your e-liquid rest in a dark, cool environment over time. During this period, complex chemical reactions occur. The flavor molecules bind with the VG and PG, harsh alcohols off-gas, and the liquid homogenizes into a smooth, cohesive flavor.
How Long Should You Steep?
The required steeping time relies entirely on the flavor profile you have created:
- Fruits and Mints (Shake and Vape): Simple fruit blends (like a standalone apple or a mango-ice) require virtually no steeping. You can shake the bottle and vape it immediately, though it will still improve slightly over 2-3 days.
- Tobaccos (1 to 2 Weeks): Tobacco concentrates are notoriously harsh and earthy when first mixed. They require a week or two to mellow out and allow the deeper, woody notes to emerge.
- Desserts and Custards (2 to 4+ Weeks): If you are wondering how long to steep dessert flavor profiles, the answer is: as long as you can stand to wait. Creams, vanillas, and custards contain heavier molecules (often involving compounds like acetoin and vanillin) that take a long time to bind with VG. A vanilla custard vaped on day one will taste bland and peppery. Vaped on day 30, it will be rich, thick, and incredibly decadent.
Methods of Steeping
- The Dark Cupboard Method (Recommended): The gold standard. Put your heavily shaken bottles in a cool, dark drawer or box. Take them out once a day, give them a vigorous shake, and put them back.
- Breathing: If a liquid has a harsh, alcoholic/chemical smell (common with some fruit and candy flavors), leave the cap off the bottle for 12 to 24 hours. This allows the volatile alcohols to evaporate. Do not leave the cap off longer than this, or you will begin to lose your actual flavor molecules and oxidize your nicotine.
- Speed Steeping (Not Recommended): You may read about using warm water baths, slow cookers, or ultrasonic cleaners to speed up the steep. While mild heat makes VG thinner and easier to shake, excessive heat will rapidly degrade and oxidize your nicotine, ruining your juice. Patience is always the best method.
Troubleshooting: Fixing Common DIY Mistakes
Even veteran mixers occasionally brew a bad batch. The key to mastering DIY vape kits is understanding how to diagnose and fix your mistakes rather than throwing the liquid down the sink.
1. Fixing Harsh Throat Hit in DIY Juice
If you take a pull of your new creation and it burns your throat or makes you cough, several factors could be at play:
- Nicotine Quality/Oxidation: If your nicotine base has gone bad (oxidized), it will impart a peppery taste and a harsh throat hit. Test this by mixing a small batch of just PG/VG and your nicotine (no flavors). If it is harsh, your nicotine is the culprit.
- Too Much PG: PG provides throat hit. If you mixed a 50/50 ratio but are using a high-wattage sub-ohm tank, it will be incredibly harsh. Try mixing a 70VG/30PG batch instead.
- Specific Flavorings: Certain flavor profiles naturally carry a throat hit. Citrus fruits (lemon, lime, grapefruit), cinnamon, and pineapple are notorious for being harsh. Lowering the percentage of these flavors or adding a touch of marshmallow or cream concentrate can smooth out the harshness.
2. Muted Flavor (Tasting Nothing)
If your juice tastes like lightly sweetened air:
- Vaper’s Tongue: You may have olfactory fatigue from vaping the same profile too much. Drink water, sniff some coffee beans, or vape a strong menthol for a day to reset your palate.
- Over-flavoring: As mentioned earlier, too much flavor concentrate overwhelms the senses and paradoxically mutes the taste. If your recipe totals 20%+ flavoring, try cutting it in half.
- Insufficient Steeping: Desserts and creams take weeks to develop. If you are vaping a custard on day two, lack of flavor is completely normal.
3. Chemical, Perfume, or Soapy Taste
This almost always points to two things:
- Floral/Perfume: You used a specific floral or fruit flavor at too high a percentage. (For example, TFA Peach used above 4% often tastes like hairspray or perfume to many people). Drop the percentage significantly.
- Chemical/Soap: The flavor concentrate contains ethyl alcohol as a carrier, which has not off-gassed yet. Let the bottle “breathe” with the cap off for 12 hours, then steep for another week.
Organization and Longevity: Proper Storage
When you invest in DIY vape mix kits, you are often buying materials in bulk to save money. If you do not store these materials properly, they will degrade, costing you money in the long run. Knowing the rules of storing bulk base liquids correctly is paramount.
Storing Propylene Glycol and Vegetable Glycerin
Both PG and VG have very long shelf lives (typically 1 to 2 years from opening). They should be stored in tightly sealed bottles at room temperature, away from direct sunlight. UV light and heat will slowly degrade them. Large jugs should be kept in a dark closet or cupboard.
Storing Flavor Concentrates
Flavor concentrates should also be kept in a cool, dark place. Never put flavorings in the refrigerator or freezer! Cold temperatures can cause the chemical compounds in the flavors to separate and crystallize, ruining the profile. A dedicated tackle box, nail polish rack, or desk drawer is ideal.
Storing Nicotine
Nicotine is highly volatile. It is rapidly degraded by three things: Heat, Light, and Oxygen. When nicotine degrades (oxidizes), it turns dark yellow or brown, develops a harsh, peppery taste, and loses its potency.
- The Freezer is your best friend: To ensure your unflavored nicotine base lasts for years, break down your bulk purchase into smaller amber glass bottles. Fill them to the absolute brim (to eliminate oxygen inside the bottle), seal them tightly, and put them in the freezer.
- Note: PG/VG-based nicotine will not turn solid in a standard residential freezer; it will just become very thick. When you need to mix, take a small bottle out, let it come to room temperature so it is easy to work with, and leave the rest safely frozen.
Proven Vape Juice Recipes to Get You Started
Starting with a blank canvas can be overwhelming. To help you utilize your beginner e-liquid mixing supplies, here are three highly popular, well-tested vape juice recipes.
Note: The percentages below dictate the flavorings. Plug these percentages, along with your desired PG/VG ratio and nicotine strength, into your vape juice calculator to get the exact gram weights.
Recipe 1: The Foolproof Strawberry Cream
A classic profile that appeals to almost every palate. This recipe balances sweet, juicy fruit with a thick, luscious cream base.
- TFA Strawberry Ripe: 4.0%
- CAP Sweet Strawberry: 3.0%
- TFA Vanilla Bean Ice Cream: 4.0%
- CAP New York Cheesecake: 2.0%
- Steep Time: 10 to 14 days.
- Why it works: TFA Strawberry Ripe provides authenticity, while CAP Sweet Strawberry provides a candy-like syrup note. The Vanilla Bean Ice Cream and Cheesecake merge to create a thick dairy mouthfeel without overwhelming the fruit.
Recipe 2: The Morning Coffee Companion (Vanilla Custard)
Rich, dark, and sweet. This is the ultimate pairing for a morning cup of coffee, but it requires patience.
- CAP Vanilla Custard (V1): 6.0%
- TFA Bavarian Cream: 2.0%
- TFA French Vanilla: 1.5%
- Steep Time: 3 to 4 weeks (Do not rush this!).
- Why it works: CAP Vanilla Custard is widely considered the king of custards. The Bavarian cream adds depth and a darker caramel note, while the French Vanilla boosts the top notes to ensure the vanilla shines through the heavy egg-cream base.
Recipe 3: The Arctic Blue Razz (Shake and Vape)
For those who want immediate gratification and love disposable-style profiles. This is bright, sweet, and freezing cold.
- LB (Liquid Barn) Blue Raspberry: 6.0%
- TFA Raspberry (Sweet): 2.0%
- WS-23 (30% Cooling Agent): 1.0%
- CAP Super Sweet: 0.5%
- Steep Time: 0 days (Shake and Vape).
- Why it works: LB makes a fantastic blue slushie base. The TFA Sweet Raspberry gives it a realistic berry kick. WS-23 provides an ice-cold hit without the minty taste of traditional menthol, and the sweetener makes it pop like a commercial disposable vape.
Expanding Your Horizons: The DIY Community
One of the greatest assets you have when buying diy vape kits is not what is in the box, but the community surrounding the hobby. You do not have to learn in a vacuum.
There are massive online databases, subreddits (like r/DIY_eJuice), and forums dedicated entirely to the art of mixing. These communities offer tens of thousands of publicly rated recipes, flavor concentrate reviews, and instant troubleshooting help. Once you get the hang of basic mixing, participating in these communities will teach you advanced techniques, such as flavor pairing theories, using additives like malic acid (sourness), and cloning your favorite commercial premium liquids.
Final Thoughts on Your DIY Journey
Making the transition from buying commercial e-liquids to utilizing DIY vape mix kits is one of the most rewarding decisions a vaper can make. While the initial terminology and equipment list—scales, calculators, specific gravities, and steeping times—can seem like a steep learning curve, the physical act of mixing is incredibly straightforward. Within a few short sessions, measuring out grams and shaking up fresh bottles will become second nature.
By taking the time to understand your vegetable glycerin vs propylene glycol ratio, respecting the safety precautions for handling liquid nicotine, and treating your flavor concentrates like an artisan chef, you unlock infinite possibilities. You are no longer bound by what local vape shops choose to stock, nor are you subject to the exorbitant taxes and markups placed on commercial liquids.
You have total control. So grab your scale, fire up your calculator, and start mixing. The perfect, all-day vape is waiting for you to create it. Happy mixing!