It is 2:00 AM, your research is finally complete, but your bibliography looks like an absolute disaster. Staring at a chaotic pile of sources, you realize you still need to properly format fifty different books and articles before sunrise. Academic writing pressure often peaks in these quiet, desperate hours. What if you could format that entire document in just three clicks instead of three tedious hours? Have the Best information about formatação abnt automatic.
Losing points on a brilliant paper simply because a comma sits in the wrong place is a universal frustration. According to university writing center surveys, students consistently bleed grade points over three specific technicalities: incorrect paragraph indentation, inconsistent font sizes, and jumbled reference sequencing. Manually policing these tiny details drains your energy. We desperately need better strategies to avoid errors in citations acadêmicas without losing our minds.
Think of these Brazilian Technical Standards, or ABNT, less as a bureaucratic punishment and more as a strict social protocol. Just as there is an expected way to dress for a formal wedding, there is a way to “dress” a paper so everyone immediately recognizes the information. Following this academic dress code ensures your professors focus entirely on your hard-earned arguments. The rules simply create a universal visual language for your ideas.
Escaping the painful cycle of manual typing requires stepping into the world of metadata-driven formatting. Instead of painstakingly memorizing rule codes, you can make the transition from manual frustration to digital magic. This technology treats your sources as distinct packets of basic information—such as an author’s name or publication year—rather than as rigid lines of text on a page. Embracing automatic ABNT formatting transforms a terrifying chore into an effortless background process.
Functioning much like a high-end kitchen robot, these modern tools take your raw digital ingredients and seamlessly chop, cook, and plate them to perfection. You simply provide the core details, and the software handles the complex spacing and punctuation behind the scenes. This fundamental shift toward technology represents the ultimate otimização do tempo na redação acadêmica. You finally get the freedom to focus on your content rather than obsessing over your commas.
Setting up a fully automated document from the very first blank page requires feeding the right information into these tools and applying a quick final polish before submission.
Why Manual Formatting is Your Biggest Time-Waster: The NBR 14724 Structure Simplified
We’ve all been there: staring at a blank screen, wondering if the abstract comes before or after the dedication. Figuring out como formatar TCC nas normas ABNT often feels like trying to assemble a massive piece of furniture without the instruction manual. But instead of guessing your way through the document, setting up your paper’s exact skeleton before writing will easily save you two hours of tedious rearranging later.
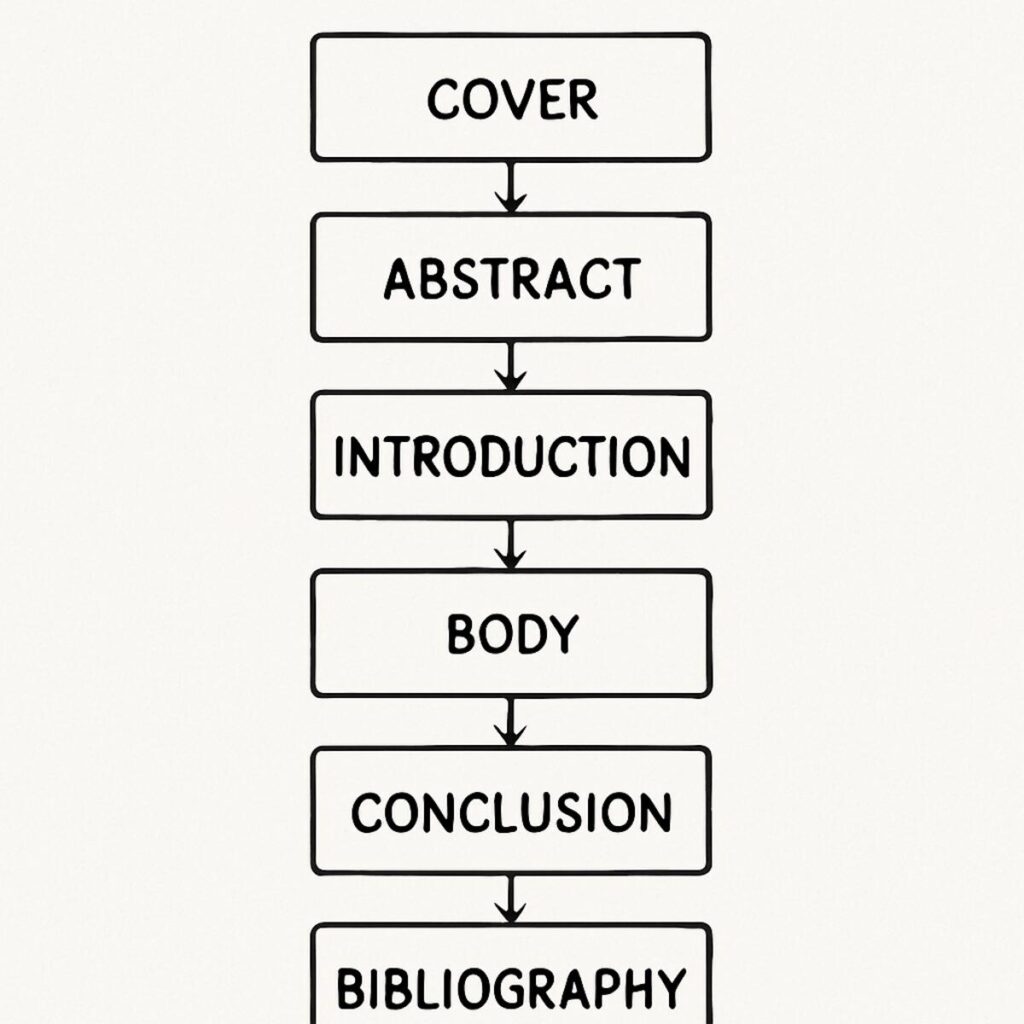
Think of your academic paper as a three-act play governed by specific rules. You already know ABNT uses unique codes for different formatting tasks; the one that dictates this overall document flow is NBR 14724. The diretrizes da NBR 14724 para estrutura divide your work into three distinct stages: pre-textual, textual, and post-textual. The secret to finishing faster is knowing exactly which parts are strictly mandatory and which ones you can safely ignore.
To build a solid foundation, focus on the non-negotiable pieces first. If you try to write a dedication or an epigraph right away, you are wasting time on optional extras. Here is your essential checklist of the mandatory elements:
- Pre-textual: Cover (Capa), Title Page (Folha de rosto), Approval Sheet (Folha de aprovação), Abstract in your language (Resumo), Abstract in a foreign language (Abstract), and Table of Contents (Sumário).
- Textual: Introduction, Development (your core chapters), and Conclusion.
- Post-textual: References (the only strictly mandatory element at the end).
Getting these specific sections clearly labeled with proper page breaks before you type a single paragraph prevents massive headaches. Rather than manually pressing “Enter” repeatedly to force pages apart—only to watch everything break when you add a new sentence later—you lock this framework in place. Many students look for modelos de TCC prontos para download simply to bypass this exact setup process, since a prebuilt skeleton gives you a massive head start.
Once your mandatory sections are mapped out, filling them in becomes significantly less overwhelming. You no longer have to worry about structural rules; you just need to focus on your actual research and ideas. The software chosen to build and hold this structural skeleton determines whether the process is incredibly easy or profoundly miserable.
The Battle of the Tools: Word vs. Google Docs vs. Specialized Generators
Deciding where to type your paper might seem like a minor detail, but it actually determines how much sleep you will lose during final revisions. When debating Word vs Google Docs para normas técnicas, you are really weighing everyday convenience against formatting power. Cloud-based editors like Google Docs let you work from anywhere and collaborate in real time, which is fantastic for early research drafts. However, desktop software like Microsoft Word offers a robust, stable environment that will not mysteriously freeze or scramble when you load it with eighty pages of heavy text and complex headers.
What usually breaks the tie between these two giants is the total size of your project and the dreaded Table of Contents. If you are writing a quick five-page essay, Google Docs will handle it flawlessly. But for a massive monograph or thesis, Word handles the automatic Sumário much more effectively. Docs often struggles to keep page numbers perfectly aligned when dealing with the strict ABNT rules for tables of contents and section breaks. Word’s desktop engine keeps those sections locked in place, preventing your carefully crafted structure from collapsing when you add a single new paragraph.
Beyond the text editor itself, introducing dedicated reference management software to the workflow transforms the process. Think of programs like Mendeley or Zotero as the ultimate kitchen robots for your bibliography. Instead of manually typing out every author, title, and year—and panicking over where the commas go—you simply feed the software the raw ingredients, known as “metadata.” The software then chops, cooks, and plates your citations perfectly into your document. These are undeniably the melhores ferramentas para padronização de trabalhos, functioning as real-time translators that instantly convert standard data into flawless ABNT format.
To make the right choice for your workflow, you need to understand the distinct strengths and fatal flaws of each option. While there are many gerenciadores de referências gratuitos para estudantes, relying on a quick fix can backfire when dealing with complex rules:
- Microsoft Word: The heavyweight champion for large files and perfect Sumário generation, though it requires a desktop installation.
- Google Docs: Unbeatable for team collaboration and cloud autosaving, but often struggles to keep ABNT page numbering aligned.
- Mendeley & Zotero: Powerful, long-term reference managers that save your library permanently and integrate directly into your word processor.
- Free Web Generators: Tempting for generating a single quick citation, but terrible for larger projects because they do not save your metadata once the browser tab closes, forcing you to start over if you need edits.
Armed with the right software combination, the computer handles the heavy lifting. Ignoring foundational rules causes perfectly cited text to spill over the page edges later. Locking down the document’s physical boundaries prevents this.
Setting the Foundation: Auto-Configuring Margens, Fonts, and Spacing
Finishing a brilliant chapter only to realize the text looks like a ransom note with mismatched fonts is a frustrating reality. Learning como formatar TCC nas normas ABNT must begin before typing a single word to avoid frustrating hours fighting the software later.
Locking down your physical boundaries prevents that annoying “jumping text” problem later. By handling the configuração de margens e recuos right away—typically 3 cm for the top and left, and 2 cm for the bottom and right—you create a secure frame. Think of this as pouring a concrete foundation; once it is locked in, your carefully arranged paragraphs will not collapse when you add a new section.
Instead of highlighting text on every single page, you can use “Paragraph Styles” to automate your design globally. Modifying the base style in your menu forces the entire document to inherit your specific font and size rules instantly. This magic feature also handles the correção de espaçamento entre parágrafos, ensuring you never have to hit the ‘Enter’ key twice just to create visual breathing room between ideas.
Applying these precise NBR settings takes only a few clicks, yet it saves an entire weekend of tedious double-checking. Just as a formal outfit signals professionalism at an interview, consistent paragraph styles tell your evaluators your work is meticulously organized. Whether your project is fifteen pages or over a hundred, this automated inheritance guarantees your formatting remains perfectly uniform.
Once the digital canvas is properly framed and styles are locked, the hardest physical setup is resolved. With the main body under control, tackling the bibliography requires automated online reference generators rather than typing every single comma.
No More Manual Typing: Using Online Reference Generators for NBR 6023
When research concludes, references often remain a chaotic mix of bare links and half-written book titles. Memorizing exactly where a period, comma, or italicized word belongs for every different media type is incredibly tedious. Instead of doing this by hand, think of reference automation like a kitchen robot: you drop in the raw ingredients, and the machine plates everything perfectly.
Behind the scenes, these tools use a functional shortcut called automated metadata scraping. When you paste a link or type a book’s ISBN, the system searches the internet to instantly extract the author, publication year, and publisher. It then arranges this data using the regras atualizadas da NBR 6023, automatically applying tricky rules like bolding the main title while leaving the author’s name in plain text.
Using a gerador de referências bibliográficas online like MORE (Mecanismo Online para Referências) or ZoteroBib requires just a simple three-step workflow:
- Select the source type: Choose whether you are citing a physical book, a YouTube video, or a website article.
- Enter the identifier: Paste the URL, DOI, or ISBN into the search bar, then let the tool scrape the data.
- Review and copy: Check the generated citation for any missing details, then copy it directly into your document.
Digital sources require one extra piece of attention before you consider them finished. Because websites frequently update or delete content, including the exact “Retrieved from” (Acesso em) date is a vital protection for your academic integrity. Once your complete list includes these dates, mastering como fazer bibliografia automática no Word is as simple as exporting the finalized list from your generator and pasting it into your pre-formatted document.
Even the best automation tools occasionally misinterpret a strangely formatted webpage, making a quick visual double-check necessary. Once the bibliography page is populated and reviewed, those end-of-document sources must connect back to the actual writing through automated in-text citations.
Mastering In-Text Citations: Automating ‘et al.’ and Author-Date Pairs
Reading over a final draft often reveals that a brilliant study mentioned in the text is mysteriously missing from the bibliography. This mismatch creates “ghost references,” a common issue that costs precious grading points and frustrates reviewers. While generating a beautiful reference list is a great start, those sources must seamlessly connect to the exact sentences where you used their ideas. Synchronizing your in-text callouts with your final list is the only way to prove exactly where your information originated.
Understanding how to format these callouts often feels like learning a strange new dialect, but it simply boils down to where you place the author’s name in your sentence. If you naturally weave the creator into your text—like stating that Machado de Assis (1899) introduced a groundbreaking narrative style—only the year goes in parentheses. Conversely, if you state a fact and just want to credit the source at the end, both the name and year are grouped in parentheses, with the author’s name in uppercase letters, looking like (ASSIS, 1899). Mastering this distinction is one of the easiest ways to avoid errors in citations without memorising a thick rulebook.
The real frustration begins when a single source is written by a small army of contributors. Under ABNT rules, citing a work with four or more authors requires the Latin shortcut “et al.”—meaning “and others”—so your paragraph does not become a cluttered wall of names. Doing this by hand means constantly counting authors and double-checking if you crossed the specific threshold. Fortunately, modern software automatically counts the contributors for you, instantly converting a massive list of names into a clean, readable “(SILVA et al., 2023)” the second it hits your page.
Relying on an automatic citation generator transforms this tedious balancing act into a quiet background process. Tools integrated directly into your word processor act like a live translator between your paragraphs and your bibliography. When you insert a source using a plug-in, the system automatically handles the author-date pair in your text, as well as the formatação de notas de rodapé e citações if your specific institution prefers a numeric style. Because the software tracks every source you cite, it guarantees that any author mentioned in your paper will automatically populate in your final reference list.
Letting software handle the synchronization between paragraphs and the bibliography frees focus for the quality of arguments. With sources securely anchored, organizing the broader layout of the document through an automated table of contents becomes a simple task.
The Magic of the ‘Sumário Automático’: From Headings to a Perfect Table of Contents
Typing hundreds of periods just to align chapter titles with page numbers is a massive time drain. A typo on page four can push a paragraph down, shifting the entire document and ruining a manually aligned index. Manually building a table of contents is a frustrating trap for anyone figuring out como formatar TCC nas normas ABNT. Instead of wasting hours fighting with the spacebar, you can let your word processor instantly generate a flawless index that adapts to your changes.
Building this magic index relies entirely on the ‘Styles’ you set up earlier in your document. Think of these styles as a structural blueprint for the software; by labeling your titles as “Heading 1” for main chapters or “Heading 2” for sub-chapters, you are establishing a clear header hierarchy mapping. The most common word processors act as the melhores ferramentas para padronização de trabalhos because they simply scan these labels and stack them into a perfectly indented list. This means your primary chapters will stand out, while your sub-sections indent neatly below them, naturally matching strict NBR hierarchy formatting rules without any manual spacing.
Generating this automated list is incredibly simple once your headings are properly tagged. If you need a reliable tutorial para criar sumário automático, the process requires only a few clicks to transform your labeled chapters into a dynamic, clickable map:
- In Microsoft Word: Click the “References” tab, select “Table of Contents,” and choose “Custom Table of Contents” to ensure the font matches the rest of your text.
- In Google Docs: Go to “Insert,” hover over “Table of contents,” and select the option that includes page numbers.
- Applying Field Updates: If you add new text that alters your layout, simply right-click the generated index and select “Update Field” (Word) or click the circular refresh icon (Docs) to instantly fix all shifting page numbers.
With the index automatically mapped, navigating the document during the writing process becomes infinitely easier. Once the text and chapters align perfectly, visual elements such as figures and tables require proper academic formatting.
Handling the Hard Stuff: Automatic Figures, Tables, and Lists of Illustrations
Dropping a picture or a graph into a document often feels like pulling a pin on a grenade. Suddenly, your carefully formatted text scatters, pages break in weird places, and your perfectly aligned paragraphs are ruined. While adding a basic graphic is straightforward, ensuring it adheres to academic standards is a different challenge. You need these elements to stay exactly where they belong while seamlessly generating specialized indexes.
The rules governing these visuals start with a basic social protocol of how graphics must be presented. According to the strict diretrizes da NBR 14724 para estrutura, every visual element requires two specific labels: a descriptive title placed directly above the graphic, and the source placed immediately below it. Whether using a chart from a government website or a personal photo, this top-and-bottom framing is non-negotiable. It proves to the reader exactly what they are looking at, ensuring your document looks immediately professional.
To prevent these titles and sources from separating from their images when you edit text later, you must utilize caption anchoring. Think of this feature as a digital paperclip that physically binds the descriptive text to the picture. Instead of typing the title in a normal paragraph, right-click the graphic and select “Insert Caption.” This locks the visual and its text into a single unit, preventing the floating image nightmare where a photo jumps to page ten while its title remains stuck on page nine.
This built-in caption tool offers a massive advantage by automatically handling list sequencing through cross-referencing. If you insert a new graph before “Figure 4,” the software instantly renumbers everything that follows. This digital tagging is the backbone of automatic ABNT formatting, allowing the word processor to instantly generate a flawless List of Illustrations at the beginning of your paper. It completely eliminates the anxiety of page shifts, leaving you only to double-check your configuração de margens e recuos so the text wraps neatly around your graphics.
Once visual elements are securely tied down and dynamically updated, one of the most frustrating manual tasks in academic writing disappears. Organizing the external research itself requires leveraging advanced automation tools for massive projects.
Advanced Automation: Leveraging Zotero and Mendeley for Massive Projects
With thesis content finalized, manually typing out fifty different bibliographical entries becomes an overwhelming hurdle. When dealing with a massive project, basic word processor tools quickly become overwhelming and prone to human error. This is where standalone reference management databases step in to rescue your weekend. By acting as a digital filing cabinet for every book, website, or article you read, these tools represent the ultimate otimização do tempo na redação acadêmica. Instead of typing out rules, you simply collect data.
Gathering those sources is surprisingly easy once you are comfortable installing a simple browser extension. Think of this tool as a smart digital vacuum cleaner attached directly to your web browser. When you find a great PDF on Google Scholar or a reliable article on a news site, you just click the extension icon at the top of your screen. The software instantly scans the page, extracts the author, date, and title, and securely sends it all to your database. You are feeding the raw ingredients into a kitchen robot, and the machine preps everything for you instantly.
Once you click save, that source lives permanently in your personal library, ready to be reused across any future papers you write. This is the true power of an automatic citation generator—you do the work of finding the source exactly once. Whether you need to cite a famous author like Machado de Assis for a literature review today or a completely different capstone project next year, the information is already stored, perfectly organized, and waiting for your command.
Translating that saved data into your actual document feels like absolute magic, especially when using gerenciadores de referências gratuitos para estudantes. Because the database separates raw information from visual formatting, changing your entire document from ABNT to APA takes just two clicks. It works exactly like a language translator, instantly swapping the “grammar” of your citations without altering your actual content. While both major tools offer this magic, they have slight differences for Brazilian rules:
- Zotero: Highly praised for open-source flexibility, featuring an incredibly active community that updates ABNT (NBR 6023) formatting plugins rapidly and accurately.
- Mendeley: Excellent for reading and highlighting PDFs directly within the app, though setting up the specific ABNT style can sometimes require an extra download step.
Handing over the heavy lifting of reference formatting to these databases guarantees a faster, more accurate writing process. When source details import incorrectly or visual rules behave strangely, manual troubleshooting resolves the formatting glitches.
Troubleshooting the Machine: Fixing Formatting Glitches in Word and Docs
Relying on automatic abnt formatting feels like having a personal assistant, but even the smartest software occasionally misreads a document. You might generate your bibliography only to find a book title screaming in ALL CAPS or an author’s first name missing entirely. These strange glitches usually stem from “metadata”—the hidden labels attached to the PDF or website you saved. Think of metadata as the digital nametag for your source; if the nametag is misspelled when the browser extension grabs it, your final document will print that exact typo.
Fixing these nametags requires a quick trip back to your reference manager rather than changing the text in Word or Google Docs. If you simply type over the mistake directly in your document, the software will overwrite your correction the next time it syncs, bringing the error right back to haunt you. To permanently evitar erros em citações acadêmicas, open Zotero or Mendeley, click on the problematic source, and manually edit the information panel on the right side of the screen. Once you correct the author’s name or adjust the capitalization there, clicking the refresh button in your word processor magically updates every citation instantly.
Certain specific Brazilian rules demand a bit of human intervention, especially the dreaded “Apud” citation, which you use when quoting an author who was quoted by someone else. Automation tools frequently stumble here because they are designed for direct sources rather than nested ones. Instead of typing the whole citation by hand and breaking the software’s link, use your tool’s “Add Prefix” or “Edit Citation” button. This manual override protocol allows you to type “apud” immediately before the generated name, preserving the automation while meeting the precise NBR standards.
Beyond individual citations, the software sometimes ignores the visual layout rules for the bibliography page itself. You might notice the word “References” is pushed to the left margin instead of being perfectly centered, or the gaps between entries look suspiciously wide. Applying a quick correção de espaçamento entre parágrafos directly in Word’s paragraph settings ensures the list is single-spaced internally with a blank line between each item. You will also need to manually center the “References” heading and make it bold, as many automated plugins default to standard left alignment.
Taking a few minutes to clean up minor software quirks guarantees time-saving benefits without sacrificing accuracy. After smoothing out formatting glitches, a final manual review ensures the submission is ready.
The 10-Point Final Checklist: A Human Review of Your Automated TCC
You started this journey dreading the endless hours of manual formatting, but you now have the tools to let automation do the heavy lifting. Instead of typing out every comma and italicized title by hand, your focus has shifted from wrestling with bureaucratic rules to refining your actual research. Integrating these tools is the ultimate secret to otimização do tempo na redação acadêmica, turning a tedious task that used to steal your weekends into a brief, manageable process.
However, even the smartest automated generators are like high-speed kitchen blenders—they only process exactly what you feed into them. Before you prepare for submission, you still need to serve as the final inspector. Performing a high-speed visual audit ensures your document perfectly aligns with the regras atualizadas da NBR 6023 and prevents small metadata glitches—like a missing author initial or a typo in a title—from costing you unnecessary points.
Run through this quick ‘Final 10’ checklist to guarantee your automated document is flawless:
- Confirm 3cm (top/left) and 2cm (bottom/right) margins are consistent.
- Verify Arial or Times New Roman size 12 is used throughout the main text.
- Check that long block quotes are correctly indented 4cm at size 10.
- Audit the text to delete any accidental extra blank pages.
- Ensure every single in-text citation has a matching entry in your bibliography.
- Validate that “et al.” is used correctly for sources with four or more authors.
- Confirm all section headers are numbered and styled consistently.
- Scan reference links to ensure none are broken or missing their access dates.
- Check for stray double spaces between words or sentences.
- Review the cover page and title page for exact alignment and missing institutional details.
Once every box is checked, your absolute last step must be to export the file as a PDF. Never send a Word document or a Google Docs link directly to your professor or grading committee. Different versions of word processors will silently shift your carefully crafted margins, bump section headers to the wrong pages, and break your layout. Exporting to PDF permanently locks your formatting in place, guaranteeing that what you see on your screen is exactly what your evaluators will see.
Understanding exactly how to format TCC according to the ABNT norms no longer means memorising a dusty rulebook. It simply means knowing how to command the right software and performing a smart final audit before crossing the finish line. You have successfully transformed a dreaded hurdle into a streamlined system, freeing up your energy to focus on the ideas that truly matter. Submit your work with confidence, knowing the formatting is locked in and your research is ready to shine.