If you ask any graphic designer, illustrator, or digital artist about their early days of learning design software, you will almost universally hear stories of frustration regarding one specific feature: the Pen Tool. It is the gatekeeper of vector graphics, a notoriously stubborn instrument that seems to defy the natural logic of drawing. Yet, once conquered, it becomes the most powerful weapon in a creative professional’s arsenal. Have the Best information about juragan4d.
To bridge the gap between frustration and mastery, the design community has embraced a brilliant solution: gamification. Immersing yourself in a pen tool game is no longer just a fun distraction; it is a proven, highly effective educational strategy. By transforming repetitive node-plotting into an engaging challenge, designers can build muscle memory and spatial awareness without the stress of a looming project deadline.
In this comprehensive guide, we will deconstruct the mechanics of vector drawing, explore the best interactive training methods, and equip you with the practical knowledge to master this essential tool. Whether you are creating logos in Adobe Illustrator, masking photos in Photoshop, or designing user interfaces in Figma, the principles you learn here will fundamentally elevate your digital artistry.
Chapter 1: The Psychology and Mechanics of Vector Drawing
Before we can master the tools, we must first understand the medium. Vector graphics operate on a fundamentally different paradigm than raster graphics (pixels). If you have ever felt completely lost while trying to draw a simple curved line, you are not alone.
Why is Vector Pathing Difficult to Learn?
If you are wondering, “why is vector pathing difficult to learn?”, the answer lies in the cognitive shift required to use it. When you draw with a pencil on paper, or use a brush tool on a digital canvas, you are engaging in continuous, intuitive motion. Your hand moves, and a line directly follows that movement.
Vector drawing, on the other hand, is an exercise in predicting the future. You are not drawing a line; you are plotting waypoints (anchor points) and dictating how a mathematical curve should behave as it travels between those points. It is less like sketching and more like architectural drafting. You have to think two steps ahead of where your cursor actually is. This disconnect between physical hand movement and the resulting line is what creates the initial steep learning curve.
The Mathematical Basis of Bezier Segments
To truly understand what happens when you click and drag the Pen Tool, we have to look under the hood. The curves you create are called Bézier curves, named after Pierre Bézier, a French engineer who popularized them in the 1960s for designing Renault automobile bodies.
The mathematical basis of bezier segments relies on parametric equations. In simple terms, a standard cubic Bézier curve (the kind most design software uses) is defined by four points:
- Point A (Start Anchor): Where the line begins.
- Point B (First Control Handle): The magnetic pull that dictates the initial direction and steepness of the curve leaving Point A.
- Point C (Second Control Handle): The magnetic pull that dictates how the curve approaches the final destination.
- Point D (End Anchor): Where the line ends.
The curve doesn’t actually pass through the control handles; instead, it is mathematically “pulled” toward them. The length of the handle determines the strength of that pull, and the angle determines the direction. Understanding this concept is the very first step in mastering bezier curves for beginners. You are not drawing the curve; you are defining the gravitational forces that shape it.
Chapter 2: Gamifying Your Education
Traditional learning methods often involve reading manuals or watching hours of video tutorials. While these are valuable, nothing beats hands-on practice. This is where gamification steps in to save the day.
The Rise of the Pen Tool Game
A pen tool game takes the core mechanics of plotting anchor points and adjusting handles and wraps them in a structured, score-based challenge. Instead of staring at a blank canvas, you are given specific shapes to trace within a limited number of nodes.
One of the most famous examples is The Bézier Game, a web-based training exercise that starts with simple straight lines and quickly escalates into complex shapes like cars, hearts, and paper clips. The game forces you to be economical with your anchor points. In the vector world, fewer points equal smoother curves. By penalizing you for using too many nodes, these games instill best practices from day one.
Adobe Pen Tool Game and Interactive Tutorials
Software giants have also recognized the value of gamified learning. The Adobe pen tool game concept is integrated directly into software like Illustrator through interactive, in-app tutorials. Adobe provides guided files that prompt users to connect the dots, with visual hints showing exactly where to click, how far to drag, and when to hold down modifier keys.
Furthermore, there is a wealth of free web-based design training tools available today. Platforms like Method of Action offer gamified experiences for various design disciplines, including kerning, color matching, and, of course, shaping vectors. Utilizing these interactive vector drawing exercises for just 15 minutes a day will dramatically accelerate your learning curve compared to unstructured practice.
Chapter 3: Anatomy of a Vector Path
To communicate effectively with the software, you need to understand the anatomy of a path. A vector path is made up of several distinct components, and mastering them is the key to fluid, precise design.
Anchor Points: The Foundation
Anchor points are the pins that hold your path to the digital canvas. Every path must have at least a starting anchor point and an ending anchor point. Understanding Adobe Illustrator node manipulation basics requires recognising that there are two distinct types of anchor points.
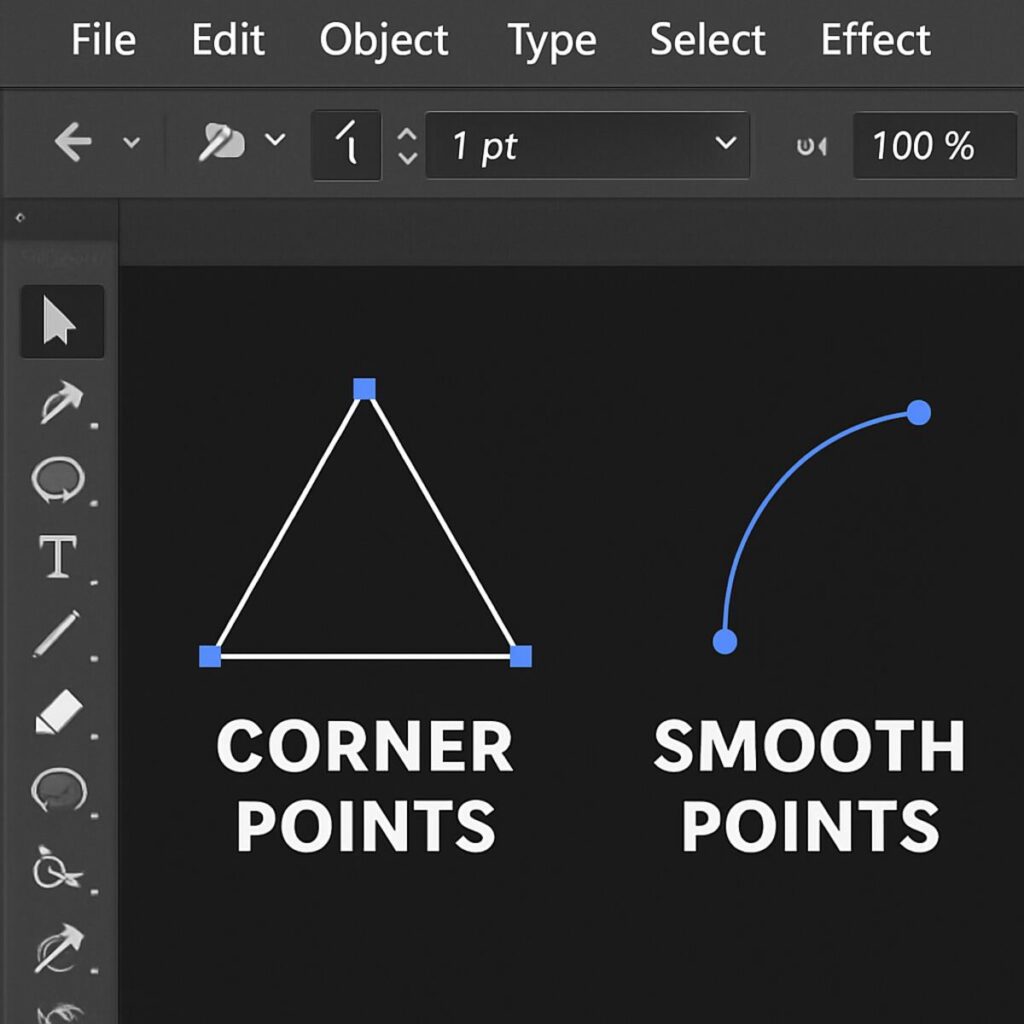
Difference Between Corner and Smooth Points
Knowing the difference between corner and smooth points is critical:
- Smooth Points: When you click and drag with the Pen Tool, you create a smooth point. This point has two control handles extending in opposite directions on a single, unbroken axis. It ensures a seamless, continuous curve as the path passes through the node. If you move one handle, the opposite handle moves like a seesaw to maintain the smooth transition.
- Corner Points: When you simply click (without dragging), you create a corner point. This results in a sharp angle or straight line. A corner point can have no handles (connecting two straight lines), one handle (a straight line transitioning into a curve), or two independent handles that are “broken” (creating a sharp change in direction between two curved segments).
Control Handles: The Steering Wheel
As mentioned in the mathematical section, control handles dictate the curve’s trajectory. A common beginner mistake is ignoring the handles entirely and just plotting dozens of anchor points to force a curve into shape. This results in lumpy, unprofessional artwork. By learning how to properly manipulate these handles, you can create elegant, sweeping curves with just two or three nodes.
Chapter 4: Setting the Foundation for Success
Before you dive into drawing complex illustrations, you need to set up your physical and digital environment for success. Vector precision requires control over both the software and your physical input device.
Improving Mouse Control for Digital Artists
One of the most overlooked aspects of digital design is physical ergonomics. Improving mouse control for digital artists is essential for mastering the Pen Tool.
- DPI Settings: Lower your mouse DPI (Dots Per Inch) when doing precision pathing. A hyper-sensitive mouse is great for gaming, but terrible for making minute adjustments to a Bezier handle.
- Use a Quality Mousepad: A smooth, consistent surface prevents cursor jumping.
- Grip and Pivot: Draw from your elbow or shoulder, not just your wrist. This provides smoother, more deliberate movements when dragging handles.
- Consider a Graphics Tablet: While not strictly necessary for the Pen Tool (unlike digital painting), using a stylus can feel more natural for some designers and helps reduce wrist fatigue.
Mastering Bezier Curves for Beginners: The “Clock” Method
If you are a beginner, knowing where to place your anchor points is half the battle. A highly effective technique is the “Clock Method” (also known as the Extremes Method).
Imagine the shape you want to draw is encompassed by a clock face. You should place your anchor points only at the outermost edges of the shape—typically where the curve hits 12, 3, 6, and 9 o’clock.
- Place a point at the top-most part of the curve.
- Place the next point at the right-most part.
- Place the next at the bottom-most part.
- And finally, the left-most part.
By holding the Shift key while dragging your handles at these specific points, you force them into perfectly horizontal or vertical alignment. This creates mathematically flawless circles and ovals, and serves as an incredibly stable foundation for more complex curves.
Chapter 5: Advanced Pen Tool Mechanics
Once you understand the basic point-and-click operations, it is time to unlock the true power of the Pen Tool through keyboard modifiers. Your non-mouse hand is just as important as your drawing hand.
How to Adjust Pen Tool Handles on the Fly
You don’t have to draw a perfect path on the first try. In fact, professionals rarely do. The secret is knowing how to adjust pen tool handles during and after the drawing process.
- The Spacebar (Reposition): What happens if you click to place an anchor point, but realize it’s slightly in the wrong spot? Do not let go of the mouse button! Press and hold the Spacebar. This freezes the curve and lets you move the anchor point around the canvas. Release the Spacebar, and you can go back to dragging the handles.
- The Alt/Option Key (Break the Handle): This is the most crucial modifier for drawing complex shapes. If you are drawing a smooth curve but suddenly need to change direction sharply (like drawing the tip of a crescent moon), you need to convert a smooth point into a corner point. By holding Alt (Windows) or Option (Mac) while clicking on an active handle, you “break” the seesaw connection. You can now move the forward-facing handle in a completely new direction without affecting the curve behind you.
Manipulating Directional Handles for Precision
When editing a path after it has been drawn, manipulating directional handles for precision requires switching tools. In Adobe Illustrator, this is the Direct Selection Tool (the white arrow).
- Lengthening/Shortening Handles: Clicking a handle end and pulling it away from the anchor point increases the tension, pushing the curve further out. Pushing it closer to the anchor flattens the curve.
- Retracting Handles: If you want to remove a curve entirely and make a straight line, you can use the Anchor Point Tool (Shift + C in Illustrator) and simply click on a smooth node. This deletes the handles and turns them into a sharp corner.
- Constraining Angles: Holding Shift while moving a handle will snap its movement to 45-degree increments. This is invaluable for maintaining symmetry and straight lines.
Chapter 6: Practical Workflows and Techniques
Theory and mechanics are vital, but how does this apply to real-world design scenarios? Let’s explore how to use the Pen Tool in practical, everyday situations.
Techniques for Drawing Complex Paths
When faced with a highly complex illustration—such as a detailed architectural sketch or an ornate typography piece—the Pen Tool can feel overwhelming. Here are professional techniques for drawing complex paths:
- Break It Down: Do not try to draw a complex object as a single, continuous path. Break the object down into its primitive, overlapping shapes. Draw the main body, then draw the appendages or details separately. You can use pathfinder tools (like Unite or Merge) later to combine them.
- The Overlap Strategy: If part of a shape is going to be hidden behind another object, don’t waste time making the hidden edge perfect. Let the paths overlap loosely where they won’t be seen.
- Focus on the Silhouette: When outlining an object, focus entirely on the outer edge. Once the silhouette is perfect, you can go back in and draw the internal details.
Sketching with Pen: A Digital Paradox
Can you really engage in sketching with a pen digitally, considering how rigid vectors are? Yes! Many modern illustrators use the Pen Tool not just for tracing, but for freehand ideation.
By setting your path to have no fill and only a brightly colored, thin stroke, you can rapidly plot out the structural framework of a character or layout. It requires a mental shift—you are sketching with “wireframes” rather than graphite. Because vectors are infinitely editable, you can quickly grab nodes and drastically alter the proportions of your sketch (making a head larger, or moving an arm) without having to erase and redraw anything.
Guide to Tracing Images with the Pen Tool
One of the most common tasks for graphic designers is digitizing a hand-drawn sketch or recreating a low-resolution raster logo. Here is a definitive guide to tracing images with the pen tool:
Step 1: Prep the Workspace. Place your raster image on a layer in your software. Lower the opacity of the image to around 30-40%, so it becomes faint. Lock the layer so you don’t accidentally select or move it.
Step 2: Setup Your Tool. Create a new layer on top. Select the Pen Tool. Set your “Fill” to None, and your “Stroke” to a highly visible color (like magenta or cyan) with a 1pt thickness.
Step 3: Identify the Corners. Look at the object you are tracing. Mentally map out every sharp corner or sudden change in direction. These are your guaranteed anchor point locations.
Step 4: Plot the Extremes. Use the “Clock Method” discussed earlier to plot points on the widest arcs of the curves.
Step 5: Trace and Refine. Click and drag to lay down your paths, using the Alt/Option key to break handles at the corners. Don’t worry about being 100% perfect on the first pass.
Step 6: The Polish Phase. Once the path is closed, use the Direct Selection Tool to zoom in close and nudge your anchor points and handles until the vector path perfectly matches the sketch beneath it.
Chapter 7: Photoshop Paths and Troubleshooting
While the Pen Tool is closely associated with Adobe Illustrator, it is equally critical in raster-based software like Photoshop, where it is primarily used to create precise selections, masks, and clipping paths.
Closing Open Paths in Photoshop
When using the Pen Tool in Photoshop to extract an object from its background (creating a clipping path), you must ensure your path is a continuous, closed loop. Leaving a path open can result in unpredictable selections and flawed masks.
Closing open paths in photoshop is straightforward but essential:
- As you trace the perimeter of your subject, continue all the way around until you return to your very first anchor point.
- Hover your Pen Tool cursor over that initial starting point.
- You will notice a tiny circle icon appear next to the Pen cursor. This is the universal software indicator that clicking now will close the shape.
- Click the point. Your path is now closed. You can now right-click inside the path and choose “Make Selection,” safe in the knowledge that your selection will perfectly follow your drawn line.
If you accidentally deselect your path before closing it, simply select the Pen Tool, click once on the last anchor point you made (a small link icon will appear to show you are continuing the path), and then proceed to close it.
Smoothing Jagged Vector Lines Tutorial
Even with practice, you might end up with paths that look a bit lumpy or angular. If you find yourself needing a smoothing jagged vector lines tutorial, follow these corrective steps:
- Reduce Anchor Points: The number one cause of jagged lines is having too many nodes clustered together. Use the Delete Anchor Point Tool (the Pen Tool with a minus sign) to click and remove unnecessary points. The fewer points you have, the smoother the curve will naturally be.
- Use the Smooth Tool: Adobe Illustrator has a dedicated Smooth Tool (usually hidden under the Shaper or Pencil tool). Select your jagged path, grab the Smooth Tool, and literally “paint” over the rough areas. The software will automatically recalculate and simplify the Bezier math to create a flowing curve.
- Adjust Handle Symmetry: A jagged transition often occurs when two handles on a smooth point are vastly different lengths. Using the Direct Selection Tool, adjust the handles so they are roughly equal in length on both sides of the node. This balances the curve’s tension.
- Path Simplification: In Illustrator, you can go to Object > Path > Simplify. This brings up a slider that automatically reduces the number of anchor points while maintaining the original shape. It is a fantastic shortcut for cleaning up messy paths.
Chapter 8: The Evolution of Vector Tools
As software has advanced, developers have sought to make vector creation more intuitive, leading to the introduction of alternative tools designed to bypass the steep learning curve of the traditional Pen Tool.
Pen Tool vs Curvature Tool
In recent years, Adobe introduced the Curvature Tool, fundamentally changing how many beginners approach vector drawing. Understanding the debate of pen tool vs curvature tool is important for determining your optimal workflow.
The Curvature Tool:
- How it works: You simply click to place points, and the software automatically calculates a perfectly smooth, sweeping curve between them. You do not click and drag to pull out handles; the software manages the handles invisibly. Double-clicking creates a sharp corner.
- Pros: Extremely intuitive. It feels much more like drawing. It is incredibly fast for creating organic, flowing shapes, clouds, waves, or smooth character outlines.
- Cons: It lacks absolute precision. Because the software guesses the mathematical arc based on point placement, it can be frustratingly difficult to get the exact curve you want. It also struggles with complex, mechanical shapes that require a mix of subtle curves and sharp angles.
The Traditional Pen Tool:
- How it works: Manual plotting of nodes and explicit, manual extraction and manipulation of Bezier handles.
- Pros: Absolute, unparalleled control. You dictate every mathematical degree of the curve. It is the industry standard for a reason—it can literally draw anything with perfect precision.
- Cons: The steep learning curve we discussed earlier. It is slower to use until you have built up significant muscle memory.
The Verdict: You do not have to choose just one. Professional designers use both. The Curvature Tool is excellent for rapid blocking out of organic shapes, while the traditional Pen Tool is strictly necessary for precision tracing, typography design, and detailed mechanical illustrations. Learning the Pen Tool makes you a better user of the Curvature Tool, but not vice versa.
Chapter 9: Building a Daily Practice Routine
You do not master the Pen Tool by reading an article, just as you do not master the piano by reading sheet music. Mastery requires consistent, deliberate practice. Here is how to structure your training.
1. Warm-Up with a Pen Tool Game
Start your design sessions with a 10-minute warm-up using a pen tool game. Go to a site like The Bézier Game and try to beat your previous score. Focus on using the absolute minimum number of nodes required to pass the level. This trains your brain to see the most efficient pathing solutions.
2. Trace the Alphabet
One of the best interactive vector drawing exercises you can do offline is tracing typography. Type out the alphabet (both uppercase and lowercase) using a complex serif font like Garamond or Playfair Display. Convert the text to a low-opacity image, lock it, and try to perfectly trace the letters with the Pen Tool.
Letters are the perfect training ground because they combine every type of vector challenge: long sweeping curves (like the letter ‘O’ or ‘C’), sharp mechanical corners (like ‘E’ or ‘M’), and complex transitional curves where a straight line morphs into a bowl (like ‘R’ or ‘B’).
3. Deconstruct Existing Vectors
Go to a stock vector website and download a complex, high-quality illustration. Open it in your software and pull it apart. Look at where the professional illustrator placed their anchor points. Observe how they managed their control handles around tight corners. Reverse-engineering the work of masters is a phenomenal way to pick up advanced techniques.
4. Challenge Yourself with Real-World Objects
Once you feel comfortable, move away from flat graphics and try tracing photographs of real-world objects. Start simple—trace a smartphone, a coffee mug, or a pair of scissors. Focus on sketching with pen, identifying the silhouettes, and using the Alt/Option key to maneuver around sharp edges.
Conclusion: Embrace the Curve
The journey from a frustrated beginner staring at a tangled web of Bezier handles to a confident designer wielding the Pen Tool like a scalpel is a rite of passage. By understanding the mathematical basis of bezier segments, embracing the gamified learning of a pen tool game, and applying rigorous practice to your adobe illustrator node manipulation basics, you will conquer this tool.
Remember that the reason vector pathing is difficult to learn is exactly why it is so valuable. It requires a structural, forward-thinking mindset that elevates your overall design thinking. Every time you struggle with a curve, you are building spatial reasoning. Every time you successfully execute a complex tracing, you are refining your digital craftsmanship.
Do not be discouraged by jagged lines or runaway control handles. Use the provided troubleshooting techniques, lean on free web-based design training tools, and commit to the process. Before long, the Pen Tool will cease to be an adversary and will become an extension of your own creative intent—allowing you to draw precise, scalable, and beautiful artwork that stands the test of time.